n1 armbian 宝塔
换源
vi /etc/apt/sources.list
deb https://mirrors.ustc.edu.cn/debian stretch main contrib non-free
deb https://mirrors.ustc.edu.cn/debian stretch-updates main contrib non-free
deb https://mirrors.ustc.edu.cn/debian stretch-backports main contrib non-free
deb https://mirrors.ustc.edu.cn/debian-security/ stretch/updates main contrib non-free
apt-get update && apt-get upgrade
安装宝塔
https://www.feiji.work/2019/20.htmlwget https://www.feiji.work/n1/bt/6.9.4/install.sh && sudo bash install.sh
安装完成可能有错误提示 直接reboot重启
查看面板入口:/etc/init.d/bt default
安装nginx
https://www.feiji.work/2019/41.html
打开ssh(注:如果以下步骤提示缺少文件,可以在宝塔后台执行一次安装Nginx,在下载完脚本后直接取消安装即可。)
cd /www/server/panel/install #如果目录存在nginx 先rm
wget https://www.feiji.work/n1/bt/nginx.sh 下载nginx.sh
sh nginx.sh install #直接安装安装Nginx出现checking for GD library ... not found错误
https://de.lib.im/linux-gd.htmlapt-get -y install libgd2-xpm-dev build-essential重新安装
报错Starting nginx... nginx: [emerg] getpwnam("www") failed in /www/server/nginx/conf/nginx.conf:1
https://blog.csdn.net/rebel_yangke/article/details/58601731
修改/www/server/nginx/conf/nginx.conf 两个www改成root 再重启
pppoe宽带拨号
https://xaolong.com/post/279.html
https://malagege.github.io/blog/2019/01/26/Linux%E4%BD%BF%E7%94%A8pppoe%E9%80%A3%E7%B7%9A%E6%96%B9%E6%B3%95%E5%B0%8F%E8%A8%98/
apt install pppoeconf -y
apt install isc-dhcp-server -y

vi /etc/default/isc-dhcp-server
#将INTERFACESv4=""修改为INTERFACESv4="br0"
#在INTERFACESv6=""的前面加个#,修改为#INTERFACESv6=""

mv /etc/dhcp/dhcpd.conf /etc/dhcp/dhcpd.conf.bak

vi /etc/dhcp/dhcpd.conf  ###里面的所有内容
###
option domain-name "phicomm-n1";
option domain-name-servers 119.29.29.29;
subnet 192.168.1.0 netmask 255.255.255.0 {
    range 192.168.1.101 192.168.1.254;
    option subnet-mask 255.255.255.0;
    option broadcast-address 192.168.1.255;
    option routers 192.168.1.2;
    option domain-name-servers 119.29.29.29;
}
default-lease-time 600;
max-lease-time 7200;
authoritative;
###

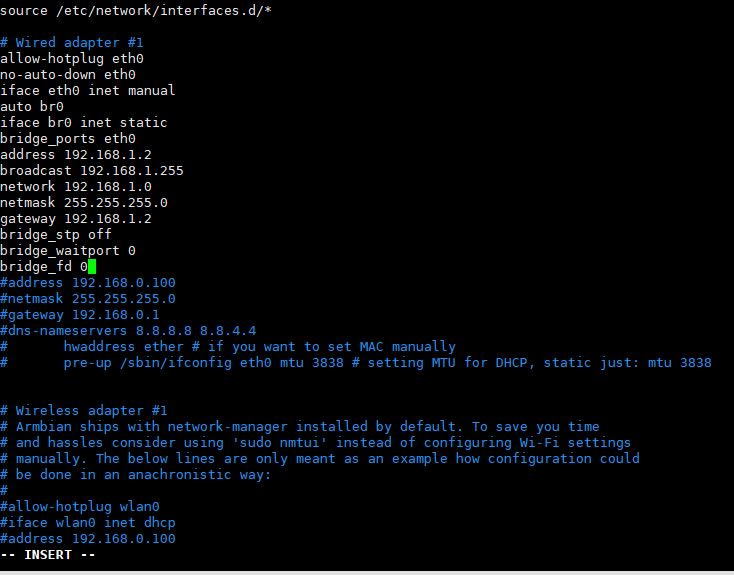
vi /etc/network/interfaces
#iface eth0 inet dhcp 改为iface eth0 inet manual 后面增加以下内容 ###里面的全部 见图一
###
auto br0
iface br0 inet static
bridge_ports eth0
address 192.168.1.2
broadcast 192.168.1.255
network 192.168.1.0
netmask 255.255.255.0
gateway 192.168.1.2
bridge_stp off
bridge_waitport 0
bridge_fd 0
###

vi /etc/sysctl.conf
#去掉net.ipv4.ip_forward=1前面的#号

sysctl -p

vi  /etc/rc.local
#在 exit 0 前一行加以下内容
iptables -t nat -A POSTROUTING -j MASQUERADE

reboot
n1接光猫 #n1已经固定IP 192.168.1.2
pppoeconf #进入拨号向导
#第一个选no
#删除username 输入宽带账号
#输入宽带密码
#之后全部 yes

poff -a # 關閉全部pppoe

查看状态
plog
ip addr show ppp0

开机自动拨号
vi /etc/rc.local #在 exit 0 前一行加一句:
pon dsl-provider账号密码配置文件地址/etc/ppp/pap-secrets
动态域名解析dns
https://github.com/NewFuture/DDNS
git clone https://github.com/NewFuture/DDNS
cd DDNS
./run.py #运行一次 生成config.json配置文件
vi config.json #修改 id 域名 token
./task.sh