小米路由器r2d配置v2ray
菜鸟一枚,根据自己操作写的记录贴,有不当的地方请指出
下载v2ray
下载地址:https://github.com/v2ray/v2ray-core/releases/
r2d选择arm:https://github.com/v2ray/v2ray-core/releases/download/v3.43/v2ray-linux-arm.zip
上传至路由器
目录:根据自己实际情况,之前又mt工具箱,所以直接放里面了/data/etc/misstar/applications/v2ray
1.解压上传客户端文件
2.上传客户端配置文件
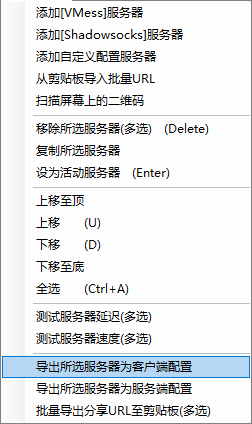
2.1导出客户端配置并上传至路由器
2.2修改配置文件,参考下面代码
{
  "log": {
    "access": "",
    "error": "error.log",
    "loglevel": "warning"
  },
  "inbound": {
    "port": 2333,
    "listen": "0.0.0.0",
    "protocol": "socks",
    "domainOverride": [
      "tls",
      "http"
    ],
    "settings": {
      "auth": "noauth",
      "udp": true,
      "ip": "127.0.0.1",
      "clients": null
    },
    "streamSettings": null
  },
  "outbound": {
    "tag": "agentout",
    "protocol": "vmess",
    "settings": {
      "vnext": [
        {
          "address": "us2.sangyu.tw",
          "port": 443,
          "users": [
            {
              "id": "xxxxxxxxxxxxxxxxxxx",
              "alterId": 233,
              "email": "t@t.tt",
              "security": "aes-128-gcm"
            }
          ]
        }
      ],
      "servers": null
    },
    "streamSettings": {
      "network": "ws",
      "security": "tls",
      "tlsSettings": {
        "allowInsecure": true,
        "serverName": null
      },
      "tcpSettings": null,
      "kcpSettings": null,
      "wsSettings": {
        "connectionReuse": true,
        "path": "/",
        "headers": {
          "Host": "us2.sangyu.tw"
        }
      },
      "httpSettings": null
    },
    "mux": {
      "enabled": true
    }
  },
    "inboundDetour":[
        {
           "protocol":"dokodemo-door",
           "port":1099,
           "settings":{
              "address":"",
              "network":"tcp",
              "timeout":0,
              "followRedirect":true
           }
        }
     ],
  "outboundDetour": [
    {
      "protocol": "freedom",
      "settings": {
        "response": null
      },
      "tag": "direct"
    },
    {
      "protocol": "blackhole",
      "settings": {
        "response": {
          "type": "http"
        }
      },
      "tag": "blockout"
    }
  ],
  "dns": {
    "servers": [
      "8.8.8.8",
      "8.8.4.4",
      "localhost"
    ]
  },
  "routing": {
    "strategy": "rules",
    "settings": {
      "domainStrategy": "IPIfNonMatch",
      "rules": [
        {
          "type": "field",
          "port": null,
          "outboundTag": "direct",
          "ip": null,
          "domain": [
            "geosite:cn"
          ]
        },
        {
          "type": "field",
          "port": null,
          "outboundTag": "direct",
          "ip": [
            "geoip:cn"
          ],
          "domain": null
        },
        {
          "type": "field",
          "port": null,
          "outboundTag": "direct",
          "ip": [
            "0.0.0.0/8",
            "10.0.0.0/8",
            "100.64.0.0/10",
            "127.0.0.0/8",
            "169.254.0.0/16",
            "172.16.0.0/12",
            "192.0.0.0/24",
            "192.0.2.0/24",
            "192.168.0.0/16",
            "198.18.0.0/15",
            "198.51.100.0/24",
            "203.0.113.0/24",
            "::1/128",
            "fc00::/7",
            "fe80::/10"
          ],
          "domain": null
        }
      ]
    }
  }
}
运行软件
1.切换到目录下:/data/etc/misstar/applications/v2ray
2.赋予权限:
chmod +x /data/etc/misstar/applications/v2ray/v2ray
chmod +x /data/etc/misstar/applications/v2ray/v2ctl3../v2ray --config=/data/etc/misstar/applications/v2ray/config.json
后台运行nohup /data/etc/misstar/applications/v2ray/v2ray --config=/data/etc/misstar/applications/v2ray/config.json &
参考:
https://ralf.ren/717
https://cloverkit.coding.me/2018/08/07/配置-V2Ray-和路由器透明代理
请问第3../v2ray --config=/data/etc/misstar/applications/v2ray/config.json,第3点是什么操作?前后都看懂了
启动v2ray 后面是配置文件的路径
请问楼主, 这个配置传上去之后, 怎么知道v2ray跑这全局模式还是PAC
用工具箱:https://sixu.life/r2d-mixbox-v2ray.html
R2D运行的时候这个结果。。。
Illegal instruction (core dumped)
用mixbox这个工具
你好,上传至路由器这里看的不是很懂。已安装了ssh和mt工具箱
编辑 /data/etc/misstar/applications/v2ray/config.json
把配置文件放进去
或者用WinSCP上传到目录
启动成功后,手机端设置默认网关后,无法上网,如何定位?
详细点,看不懂
请问楼主路由器配置好了, 那真正的客户端, 比如手机电脑怎么连上google呢. 我的是小米h3d路由器
直接链接WIFI就可以了,不再需要其他骚操作